
When our house was constructed in the early 90’s, the builder thankfully made recommendations about upgrading some materials that made fiscal sense at the time. These decisions have proven wise over the years and some will likely benefit owners well beyond our tenure in the house.
Neither of us are designers and yet we garnered ideas about our first house by reading, asking many questions, and taking copious notes during our teaching gig in Japan. Japanese home design is exquisitely simple, and when we settled in southern Oregon we spent nearly 3 years searching for the right piece of property and devouring the book, A Pattern Language. Once we found our lot, we showed our notes and drawings to a skilled designer who did her best to render our wishes into house plans that would pass code.
Once approved, the plans were passed to our builder: Tom Taylor in Talent, OR. On more than one occasion, Tom would slip the ball cap from his lanky frame, scratch his head, and give us a hopeful smile. “So you want seeded aggregate concrete to be featured both on your front porch and inside your entry as well?” That alone required a separate form and pour all by itself and Tom pulled it all off beautifully.
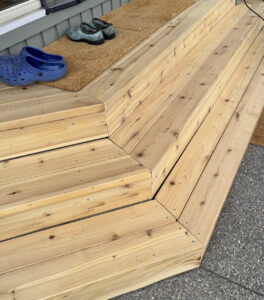
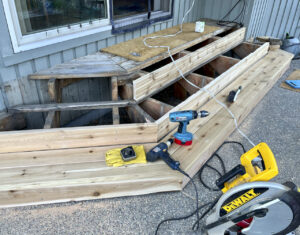
Another wise decision was to widen our outdoor concrete pour to 10′ and extend it around the entire south and eastern side of our house. What a difference that modification made! On the eastern side, the slab extends even deeper—maybe 15’—and from there Tom built a beautiful set of stairs leading up to the slider into our house from the east side. Again, his esthetics prevailed and his suggestion that we upgrade the stair material to white Alaskan cedar complemented the cedar siding we chose for our houses’s exterior.
We’re now in our 30th year in that lovely house on Paradise Lane and, like humans, it’s beginning to show its age. Nothing serious, thankfully, but there are some minor cracks in that pour and that unstained cedar had grayed from years of exposure. Thousands of footsteps left their mark as well. We’d discussed the eventuality of replacing the stairs for months before the opportunity arose. Sooney was planning a multi-day visit to Bend to help Alicia move into their new house, and I was left with gorgeous weather and plenty of time to complete the project. One downside was the cost of lumber had skyrocketed during the previous couple years. Another issue was how ill-prepared I was for the task.

Removing the old boards was the first step, and it was clear the risers were sturdy and suitable for reuse. My drawings were almost comical for I’d measured (and remeasured) each original and calculated how to maximize the new boards. Some 12-footers, a bunch of 10-footers, and a couple 8-footers. Each was labeled with a letter, and a remnant from cutting board K would be saved to used to replace board D. At the end of each day, my small pile of remnants went into our outdoor fireplace and I’d enjoy the sunset accompanied by warmth from the blaze.
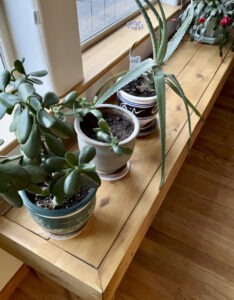
With the stairs replaced, I still had this pile of aged lumber and while the top was weathered, the bottom of most boards were mildly stained. From what, I din’t know, but with a borrowed a belt sander I took off a millimeter or so of the sides that never saw daylight. The results were interesting, and I used a few boards to make a new replacement bench for outdoors. There were a couple, however, that were really lovely, so I applied a matching oak wood stain/preservative and built a nice 7′ window seat that is home to several of our indoor plants.
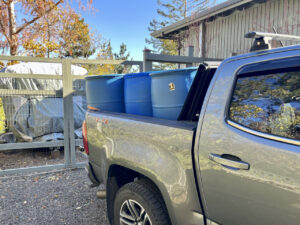
That project done, I jumped right into a second—a water catchment system. We sourced some used food-grade 55-gallon blue barrels from a guy in Grants Pass. My pick-up filled to capacity, I returned with 6 of ’em and spent several evenings exploring YouTube videos on how to proceed. There’s no shortage of how-to’s, and one was particularly helpful. It incorporated a bed of gravel for some cinder blocks (we had some kicking around), and after a dozen or so viewings I figured out how they built a PVC manifold that connected the inverted barrels so they all filled—and emptied—simultaneously.
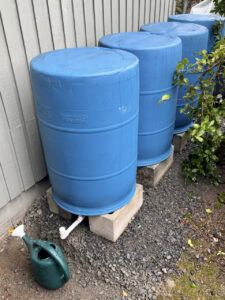 Their strategy is to tap into the barrels’ bung hole (I can’t get over that’s what those screw-in caps are called) and use union-couplers to connect each inverted barrel to a single drain line. Measure twice, cut once, and glue. PVC is fun to play with, and connecting our rain-catchment system to our rain gutters is a small—but meaningful—step toward water sustainability. Now to wait until springtime to gather all that water for our foundation plants. Good fun, and even better cognitive juice.